In Windows 10, Windows Defender Antivirus is a free and reliable anti-malware feature designed to protect your device and your data from unwanted viruses, ransomware, spyware, many forms of malware and even hackers. However, while it’s good enough for most users, there are situations when you might want to disable your antivirus permanently or temporarily.
For example, when you don’t feel confident about a solution. You must do a specific task that requires disabling the feature on your device. You are setting up a kiosk computer that does not connect to the network. Or you need to comply with your organization’s security policies.
The only caveat is that Windows 10 doesn’t include an option to uninstall or “permanently” disable Windows Defender Antivirus unless you install third-party antivirus software. However, you can still disable the built-in security feature using Group Policy, the Registry, or even use the Windows Security app temporarily.
In this Windows 10 explanation, we learn the steps to permanently (or temporarily) disable Windows Defender Antivirus on your device.
How to disable Windows Defender Antivirus using Windows Security
Before disabling the built-in security solution, if you plan to perform a specific task, you don’t need to permanently disable Windows Defender Antivirus. You only need to turn it off temporarily.
Steps to disable Windows Defender Antivirus
To temporarily disable the default antivirus on Windows 10, use the following six steps:
- 1- Open the Start menu.
2- Search for Windows Security and click on the first result to open the application.
3- Click on Virus & threat protection.
4- Under the “Virus & threat protection” settings section, click on the “Manage settings” option.
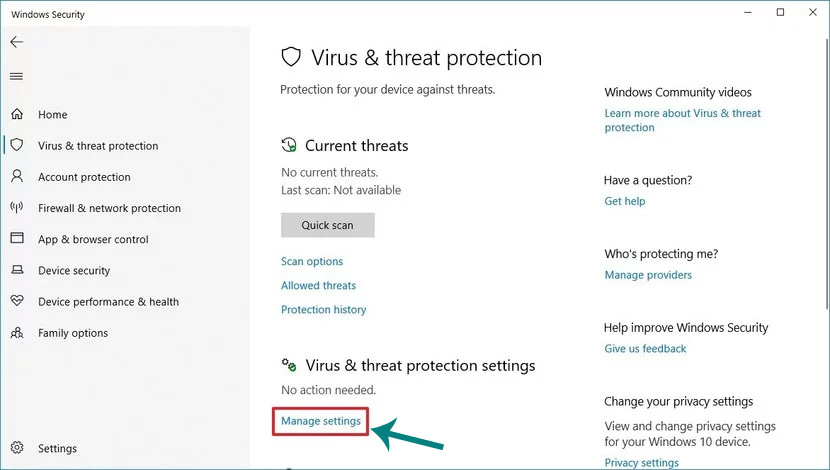
- 5- Disable Windows Defender by turning off the “Real-time protection” toggle.

Once you complete the steps, your antivirus will disable the real-time protection, which will allow you to install apps or make a certain system change that you couldn’t before because the security feature prevented the action.
To enable real-time protection again, restart your computer, or use the same instructions above, but in step 5, make sure that the “Real-time protection” toggle is turned on.
Of course, this is not a permanent solution, but it is the best option to disable Windows 10 antivirus software to perform a specific task.
How to disable Windows Defender using Group Policy
If your device is running Windows 10 Pro, you can use the Local Group Policy Editor to permanently disable Windows Defender Antivirus. However, you must first disable the tamper protection feature before attempting to turn off your antivirus software. Otherwise, the security feature will be turned back on again automatically during the next restart.
- Repeat the previous steps (the 6 steps to disable Windows Defender Antivirus)
After completing the steps, you can proceed to permanently disable Windows Defender Antivirus using Group Policy.
Disable Windows Defender Antivirus
To permanently disable Windows Defender Antivirus on your computer, use the following steps:
- 1. Open the Start menu.
2. Search for gpedit.msc and click on the top result to open the Local Group Policy Editor.
3. Browse to the following path:
Computer Configuration > Administrative Templates > Windows Components > Windows Defender Antivirus
- 4. Double-click Turn off Windows Defender Antivirus.

- 5. Select the option Enabled to disable Windows Defender Antivirus.
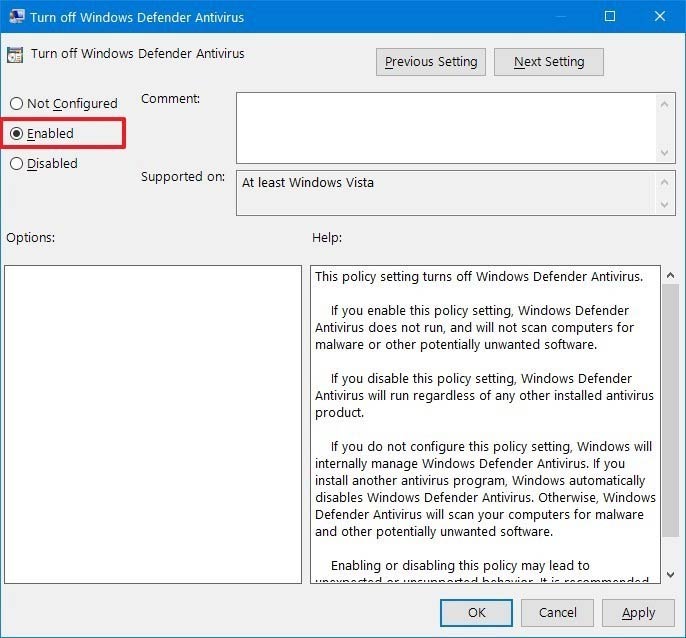
- 6. Click the Apply button.
7. Click the OK button.
8. Restart your computer.
Once you complete the steps, your Windows 10 antivirus will be permanently disabled on your PC. However, you’ll notice that the shield icon will remain in the taskbar, but this is an expected behavior because the icon is part of the Windows Security app, not your antivirus.
If you need to revert the changes, you can always re-enable Windows Defender Antivirus using the same instructions above, but in step 5, make sure the Not Configured option is selected, then restart your computer to apply the changes. Also, don’t forget to re-enable the Tamper Protection feature using the same steps above, but in step #5, make sure the toggle is enabled.
How to permanently disable Windows Defender Antivirus on Windows 10
If you feel that Windows Defender Antivirus is not for you, use this guide to permanently disable it on Windows 10.
How to disable Windows Defender Antivirus using Registry
Alternatively, if you don’t have access to the Local Group Policy Editor, or you’re running Windows 10 Home, you can still modify the registry to permanently disable Windows Defender Antivirus.
Warning: This is a friendly reminder that editing the registry is risky and can cause irreversible damage to your installation if you don’t do it correctly. It is recommended that you make a full backup of your computer before proceeding.
Disable Tamper Protection
To turn off Tamper Protection on Windows 10 before you can disable Windows Defender, use these steps:
Repeat the previous steps (the 6 steps to disable Windows Defender Antivirus)
After completing the steps, disable built-in protection will not be enabled automatically the next time you restart your computer.
Windows 10 includes a “TamperProtection” registry key (located in this path):
HKEY_LOCAL_MACHINE\SOFTWARE\Microsoft\Windows Defender\Features
To control the feature, but it is not easy to modify. As a result, it is not recommended to use it to disable this feature.
Disable Windows Defender Antivirus
To permanently disable Windows Defender Antivirus by modifying the registry, follow these steps:
1. Open Start.
2. Search for Regedit and click on the first result to open the Registry Editor.
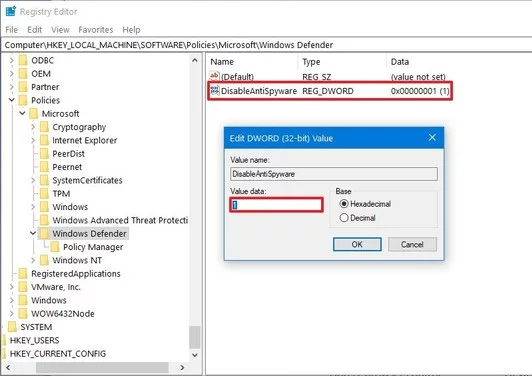
3. Browse to the following path:
HKEY_LOCAL_MACHINE \ SOFTWARE \ Policies \ Microsoft \ Windows Defender
Quick tip: You can now copy and paste the path into the record’s address bar to quickly navigate to the main destination.
4. Right-click the Windows Defender file, select New, and click 32-bit DWORD value.

- 5. Name the key DisableAntiSpyware and press Enter.
6. Double-click the newly created DWORD and change the value from 0 to 1.
-
7. Click the OK button.
8. Restart your device.Once you complete the steps, Windows Defender Antivirus will no longer protect your system from malware.
If you want to revert the changes, you can use the same instructions as above, but in step #6, right-click on the DisableAntiSpyware key and select the delete option.
Recommendation: Although there are several methods you can use to disable Windows Defender Antivirus on Windows 10, we don’t recommend using a computer without antimalware software.